
Measure another object set
When you have multiple object sets on your image, it is possible to specify the measurements to generate for each object set separately. First, click on the Object Set selection dropdown menu and select a different object set. The main measurement selection table will refresh to show the measurements that are selected for the given object set. Select the desired measurements from the table.
Measure on another channel
Certain object types (objects, whole image masks and meshes) allow you to specify the image channel to measure the intensity on. Recipe apply will measure the channel intensity of the input channel for the detected objects by default. Click on the Channel selection dropdown menu above the intensity measurement table and select a different channel. The intensity measurement table will refresh to show the selected intensity measurements for the given object set and the selected image channel. Select the desired measurements from the table.

You can add additional measurements to your analysis results (from applying a recipe apply or manual editor using other tools to generate objects) for additional further object characterization using the Measurement Tool. The tool contains a number of pre-defined measurements and can be extended through the advanced measurements taballows you to add custom Advanced Measurements.
Launch
measurement toolthe Measurement Tool
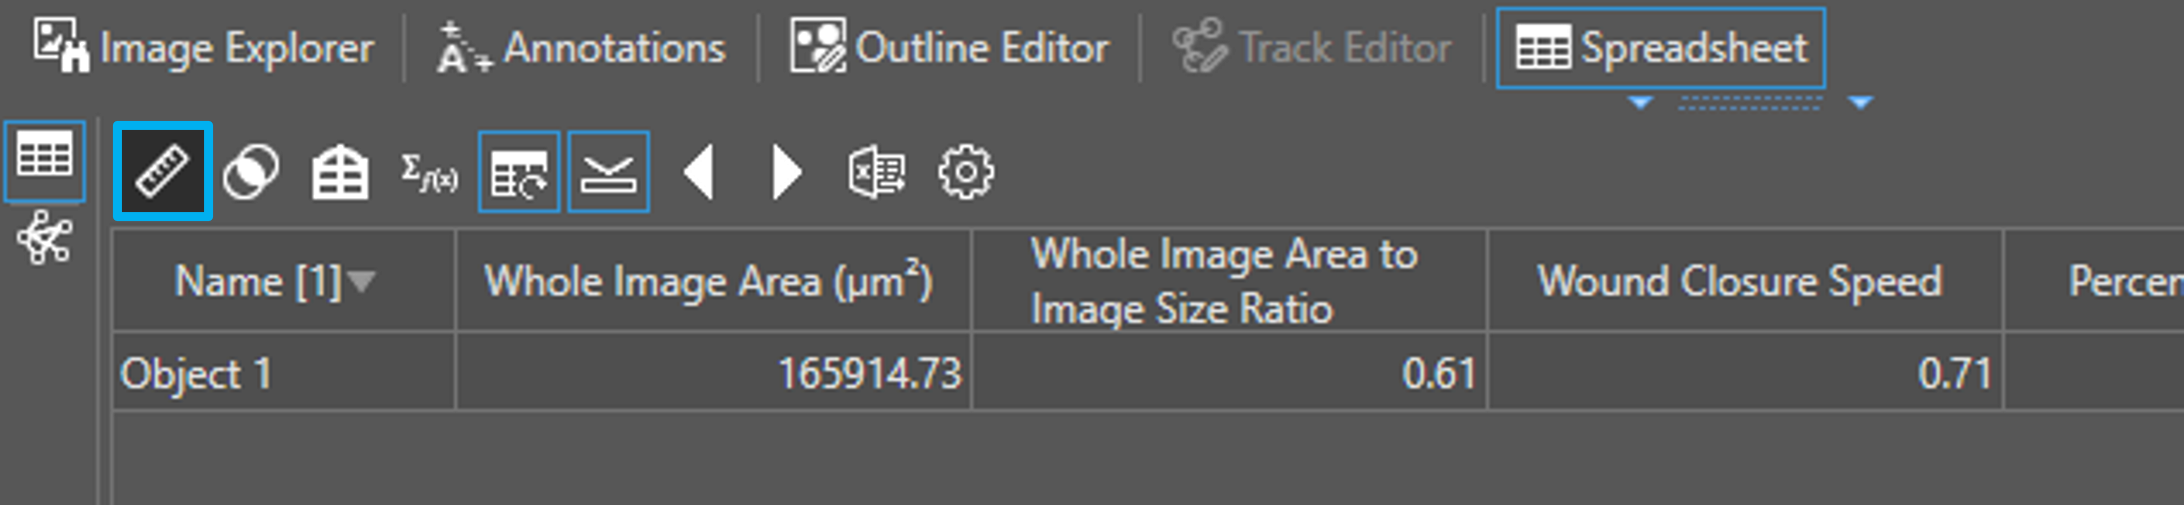
The Measurement Tool can be found in opened from the Spreadsheet tab in the Content panel Contents Panel at the bottom of the Aivia window. Clicking Click on the Measurement Tool  icon will launch a new modal window for selecting additional measurements on the current image icon (see below) to launch the Measurements window. While the window is active, you will not be able to cannot interact with the main Aivia GUI of Aivia.
Add pre-defined, general measurements
Aivia provides a plethora of measurement options pre-defined measurements depending on the objects that are available on the loaded image. You can find the measurement options that are available to you on the tabs at the top of the measurement dialog. Each measurement type correspond to a different type of analysis or different type of object.
There are twelve (12) types of measurements in Aivia:
Refer to the Measurement Definitions page for which measurements are available for which object types along with measurement definitions.
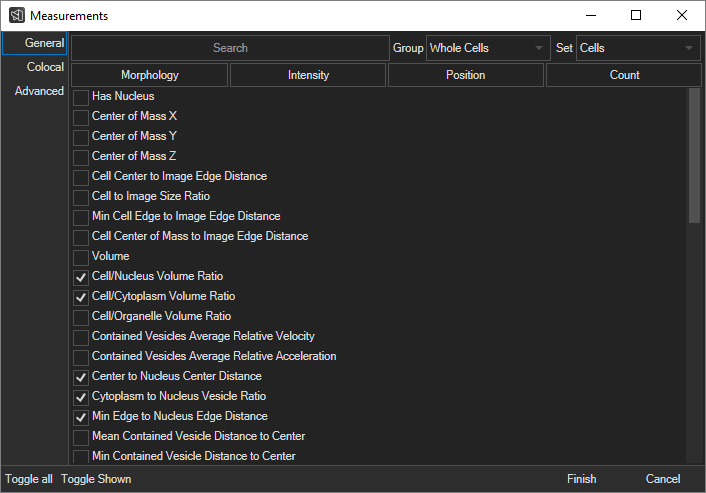
In the General tab of the Measurements window, first select the object set you would like to add measurements for using the Group and Set menus. Then, check the boxes for the measurements you would like to add. You may use the search bar to search for measurements or use the Morphology, Intensity, Position, and Count filter buttons to narrow down the measurement list. There are also Toggle All and Toggle Shown buttons that toggle whether the measurement checkboxes for all object groups and sets on the current image or all measurement checkboxes currently shown in the Measurements window are checked respectively. Once you have selected the desired measurements, click Finish to initiate calculation of the specified measurements; there is a progress bar for measurement calculation in the lower-right corner of the Aivia window. After calculation finishes, the selected measurements can be reviewed in the Spreadsheet tab or the Charts panel.
| Info |
|---|
Intensity measurements include the measured channel in parentheses; e.g., "Mean Intensity (GFP)." |
Rename measurements
To rename a measurement listed in the General tab of the Measurements window, first double click on the measurement name. In the dialog that opens, edit the measurement name in the Name textbox. Click Finish to update the measurement name or Cancel to cancel any edits to the measurement name.
Add colocalization measurements
Colocalization measurements characterize the correlation between two image channels based on segmented regions (i.e., objects)
| Panel | |
|---|---|
On this page:
|
Select measurements
You can select a specific measurement by first navigating to the tab of the measurement type you would like to measure. Click on the checkbox next to the measurement description to select or deselect the measurement. You can also select/deselect all the measurements of a given type by clicking on the Select All or Deselect All button.
Rename
You can rename a measurement by double-clicking on the name of the measurement in the selection table. The name will be highlighted when rename is active. Enter a new name and press theEnter key on the keyboard to confirm.Update
When you are finished with measurement selection, click the Finish button to close the Measurement Tool window and update the measurement list. All selected measurements will be calculated and available for review in the Spreadsheet tab or the Charts window.
To close the Measurement Tool without saving your selection or updating the measurements, click the Cancel button.. You can add colocalization measurements in the Colocal tab of the Measurements window (see below).
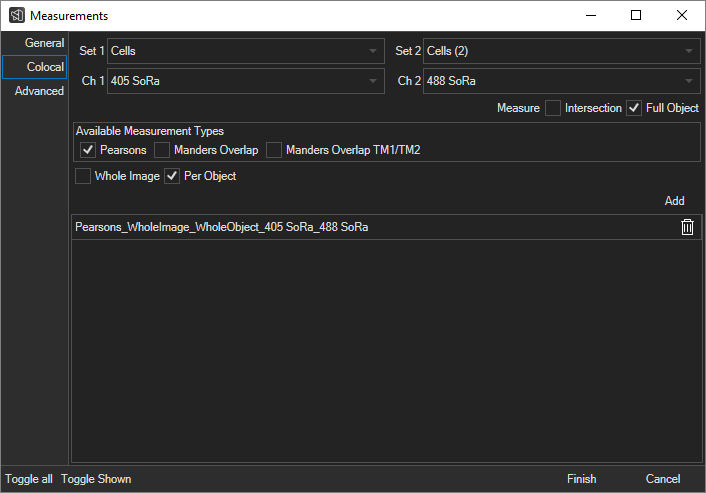
First, specify the object sets and their associated channels to measure colocalization for in the Set 1, Ch 1, Set 2, and Ch 2 menus. Then, specify the desired measurements using the three levels of checkboxes; there must be at least one box checked on each level. The levels are as follows:
- Level 1: Specify whether to measure over the regions where the objects in Set 1 and the objects in Set 2 intersect (Intersection) or measure over the full regions covered by the objects in Set 1 (Full Object).
- Level 2: Specify whether to measure the Pearson's Correlation Coefficient (Pearsons), Manders' Overlap Coefficient (Manders), or Manders Overlap TM1/TM2.
- Level 3: Specify whether to group all objects together for the measurement (Whole Image) or measure by individual object (Per Object).
Click Add to add the measurement(s) specified using the checkboxes, set menus, and channel menus to the list of colocalization measurements. Then, click Finish to initiate calculation of the specified measurements; there is a progress bar for measurement calculation in the lower-right corner of the Aivia window. After calculation finishes, the measurements can be reviewed in the Spreadsheet tab or the Charts panel.
Add custom, advanced measurements
Many custom measurements can be defined in the Advanced tab of the Measurements window (see below).
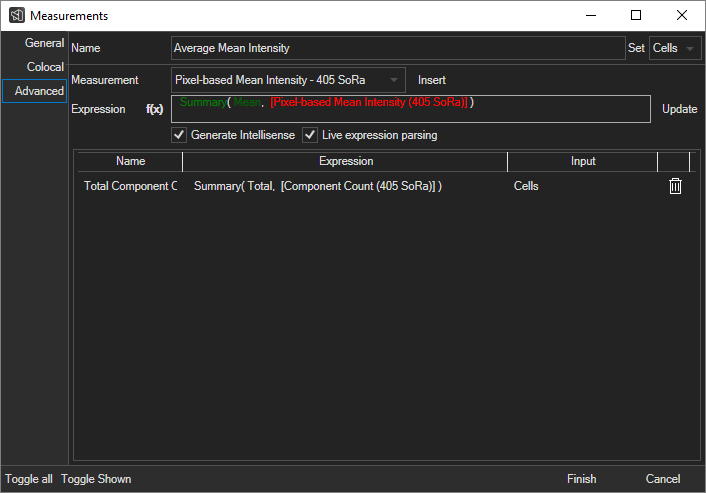
To add an Advanced Measurement, first type the name of the measurement into the Name textbox and specify the object set to measure in the Set menu. Then, type the measurement expression into the Expression field. You may insert another measurement into your expression by selecting the measurement in the Measurement menu and then clicking Insert. There are also several Advanced Measurement Functions available to use in your expression. Once you have set the measurement name, object set, and expression, click Add to add the measurement to the table of advanced measurements and click Finish to initiate calculation of the measurement. After calculation finishes, the measurement can be reviewed in the Spreadsheet tab or the Charts panel.
Please see the Advanced Measurements page for more information about adding and editing Advanced Measurements.
| Panel | |
|---|---|
On this page:
|
Related articles
| Filter by label (Content by label) | ||||||||||||||||||
|---|---|---|---|---|---|---|---|---|---|---|---|---|---|---|---|---|---|---|
|
| Page Properties | ||
|---|---|---|
| ||
|