The Classifier View is one of the special display options in Aivia allows you to create and apply custom object classifications on analyzed data. The classifier uses a random forest algorithm to identify unique features (i.e. measurements) for classification.
The Classifier View is accessed by clicking on the Classifier View icon  on the zoom bar.
On this page:
Interface
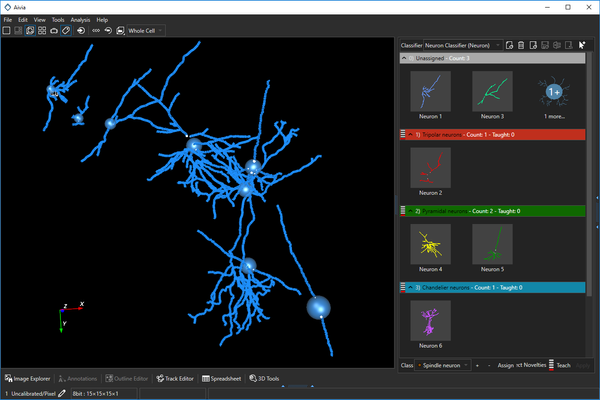
The Classifier view button is located on the zoombar directly above the Image Panel. When the Classifier View is launched, the Display Settings and Analysis Panel will collapse to the right side of the Aivia window. You can click on the vertical separator on the right side of the Aivia window to expand the right panel.
The Classifier view has two sections: the image viewer on the left and the gallery on the right. Controls for the tool is found in the gallery section.
|
| Classifier view interface |
Toolbar
The Classifier View toolbar is located at the top of the gallery on the right side of the Classifier view. The toolbar allows you to perform file actions related to the Classifier, such as selection, creation, and saving.

| Function | Icon | Description |
|---|---|---|
Classifier | The dropdown menu lets you select a loaded classifier to apply to your data. Three neuron classifiers are pre-loaded into Aivia for classifying human, rat, and mouse neurons. | |
| Create new |  | This option allows the user to create a new, blank pixel classifier for teaching |
| Delete |
| This option removes the selected classifier from Aivia. This will not delete the selected classifier from file |
| Load |
| This option allows the user to load a pre-trained classifier (.classifier) from file into Aivia |
| Save |
| This option allows the user to save the current classifier to file |
| Export classifier data to CSV |
| This option allows the user to export the classifier data (trained objects and measurements) to an Excel-readable comma-separated value (CSV) file |
| Reload classifier |
| This option reloads the current classifier to its previously-saved state, discarding any changes made to the current classifier |
| Select measurements |
| This option will launch a window that lets you specify the measurements to use in the classifier |
| Toggle multi-selection |
| This option turns on the multi-selection cursor allowing you to select multiple objects by clicking on each object in the gallery separately without holding down the Shift or Ctrl key on your keyboard |


Gallery
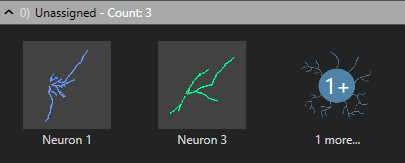
The gallery shows a thumbnail of all objects on the image as well as the thumbnails of any objects that are taught during the current session. The gallery separates the thumbnails by classes indicated by a colored header. You can expand/collapse each class separately.
In the collapsed view, a generic icon (on the right) indicates the number of additional thumbnails/objects are available in the class. Clicking on the generic icon will fully expand the current class and collapse all others.
Classifier bar
The Classifier bar is located at the bottom of the gallery and provides a number of actions for teaching and applying the classifier on the image.

Create new classifier
You will need to have analysis results, such as outlines and surfaces, to use the Classifier View. You can generate results using one of the recipes or through manual editing. Tracks are currently not supported.
You can create a new classifier from scratch by clicking on the Create New Classifier button in the Classifier View. You will be prompted to enter a name and specify the object type (see right). The general workflow for creating a classifier from scratch is as follows:
Select object type you wish to analyze using the Classifier View
- Create classes of objects as needed for identifying each phenotype
- Teach the classifier by selecting a few representative objects from each category and adding them to the relevant class gallery; click Teach when you have provided examples from each class
- Update as needed by adding additional object examples
- Select measurements to use or exclude from the classifier
- Apply classifier to the image
More information on how to use the Classifier View can be found in the How to classify objects page.
